

To access this tool elsewhere in Google Docs: On the top menu bar, click Insert > Cover image.
More: This button works the same as described above under a free or Business Starter plan, opening the “Building blocks” side panel.
The Gemini sidebar
There’s another way to interact with Gemini in Docs: Click the nova star icon at the upper-right corner (next to your Google account profile headshot) to open a Gemini side panel along the right. (If you’re using a free or Business Starter plan, this side panel will show an ad for Gemini and a button you can click to start a trial.)

The Gemini side panel in Google Docs.
Howard Wen / Foundry
You can use the Gemini sidebar for a variety of tasks, including brainstorming ideas, generating text, summarizing documents, creating lists, and more. See “Google Workspace: 7 great ways to use the Gemini AI sidebar” for detailed instructions and use cases for the Gemini side panel.
Editing, Suggesting, and Viewing modes
When you create or open a document, it is presented in Editing mode, in which you compose or edit your document normally. You can switch to two other modes:
Suggesting mode: Changes to your document appear as colored “suggestions” that can be accepted or rejected. This mode mostly comes into play when you’re collaborating with others; more on that later in this guide.
Viewing mode: You can’t edit the document, only scroll through and read it. Viewing mode can help you focus on reading through a document without being tempted to stop and edit it. You can also share a document with others in a way that limits them to Viewing mode; we’ll cover that in the sharing section of this guide.
To switch among these modes: Click the Editing mode pencil icon at the far right of the toolbar and make your selection. Alternatively, you can select View > Mode from the top menu bar.

Switching to Suggesting mode.
Howard Wen / Foundry
Document tabs
Along the left is the “Document tabs” side panel. (If you don’t see it, click the Show tabs & outlines button at the top left.) It’s a unique feature that lets you build interactive documents in two ways.
Heading links
Your document (whether it’s blank or already has content) is listed in this side panel as “Tab 1.” Click Tab 1 and it will expand down to list any headings that are in your document. When you click a heading in this side panel, your view in the main window will jump to that heading in your document.
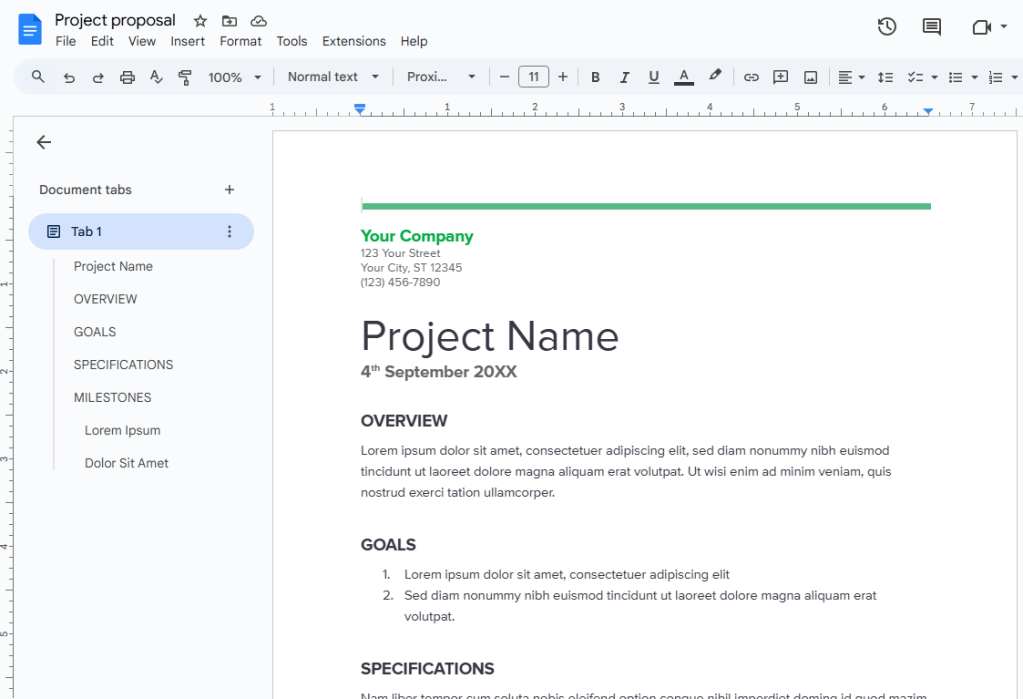
You’ll find shortcuts to each heading in your document in the “Document tabs” side panel.
Howard Wen / Foundry
To add a heading to your document: On the toolbar above your document, click Normal text and from the drop-down menu, select a heading level (Heading 1, Heading 2, etc.) and type in your heading.
In the “Document tabs” side panel, you can rename “Tab 1” by clicking the three-dot icon to its right.
Multiple tab links
You can also add more tabs, where each tab represents a separate section of the document that has its own content and formatting, and switch among them.
For instance, you could have a project management document where one tab shows the project overview and goals, a second tab lists team members and their responsibilities for the project, a third tab is a timeline table, and so on. You could create a separate document for each of those items, but the tabbed setup keeps them more tightly tied together while allowing each section to retain its own unique purpose and formatting.
A document starts with just one tab, called “Tab 1” by default. To add a new tab (“Tab 2”), click the + next to “Document tabs” in the side panel. Your view in the main window switches to a new blank document area that you can put content on.
When you create a new tab, it feels like you’re starting a whole new document, but it’s still part of the same larger document. When you look at the top of the screen, you’ll see that the document title remains the same.
You can click back and forth between these two tabbed sections of the document using the tab links in the “Document tabs” navigation. You can add and navigate to additional tabs the same way.

You can switch between tabs in your document using the left navigation panel.
Howard Wen / Foundry
You can also add a subtab underneath another tab. In the “Document tabs” side panel, hover your cursor over the tab you want to attach a subtab to, click the three-dot icon that appears to its right, and from the menu that opens, select Add subtab.
You’ll quickly realize as you add tabs and subtabs that using the default names (Tab 1, Tab 2, etc.) isn’t very helpful. To rename any tab to something more meaningful, click its three-dot icon, select Rename, and type in a new name.
Links to headings across tabs
You can insert a link in one tab that goes to a heading that’s in another tab in your document. For example, a link in Tab 1 takes you to a specific heading in Tab 3.
To create this type of link: Select a tab in the “Document tabs” side panel. In the main window showing the document, right-click on a heading. From the menu that opens, select Copy heading link.
Now select another tab in the “Document tabs” side panel. In the main window, paste the link somewhere in the document. A long URL appears with a bar next to it that contains the title of your document. Click this bar or press the Tab key on your keyboard to insert the link in your document; it will appear as a capsule with your document’s title in it.
When you (or anyone you’ve shared your document with) click the capsule you inserted, a small bar opens showing the heading. Click it, and the view in the main window will jump to this heading in this other tabbed document.

Click the MILESTONES link in the main document window to go to that heading on Tab 1.
Howard Wen / Foundry
Share your document
Through Google Docs or Google Drive, you can share a document for others to view or edit.
From the Google Docs screen where you’re editing your document: Click the Share button at the upper right. Or, from the Google Drive home screen: Right-click the filename of your document and select Share > Share from the menu that opens. Either way, the Share pane opens.

Sharing a document in Google Docs.
Howard Wen / Foundry
Google lets you share your document privately by inviting specific people to access it, or publicly, which means anyone with the link to it can open it. In most cases, business users will want to share their documents privately with specific colleagues. But there may be a few times when you need to share it publicly, such as when you’re seeking public comments on a document.
Note: In managed business environments, your administrators may limit your sharing options. For example, you might not be allowed to share a document link publicly — or even share it privately with people outside your organization.
Share your document privately (only certain people can access it)
On the Share pane, type in the names or email addresses of the people you want to collaborate with on the document. The Share pane changes to a new view where you can add more people and change their access permissions for the doc. You can also type in a brief message to them.

Setting permissions for a file being shared privately.
Howard Wen / Foundry
By default, every person you add is given Editor access to your document. You can change this by clicking Editor at the right of the invitees’ names and selecting another option from the dropdown that opens.
- Editor means they can change your document, add comments to it, and reshare it with other people.
- Commenter means they can view your document and add comments to it, but they cannot change it.
- Viewer means they can view your document, but they cannot change it or add comments to it.
Keep in mind that this setting applies to everyone you’re currently inviting to the document.
When you’re done, click Send. Everyone you’ve added will receive an email with a link they can click to access the document.
Change, limit, or revoke permissions
You can change anyone’s permissions for a document at any time by reopening the Share pane for the document. It will list everyone who has access to the document. Click the dropdown next to their name to change their permission level or remove their access entirely, then click Save.
You can also limit the overall permissions for a document somewhat by clicking the gear icon in the upper right of the Share pane:
- Unchecking the first box prevents others at the Editor level from resharing the document or changing other collaborators’ permission level.
- Unchecking the second box prevents anyone with Viewer or Commenter status from downloading, printing, or copying the document.
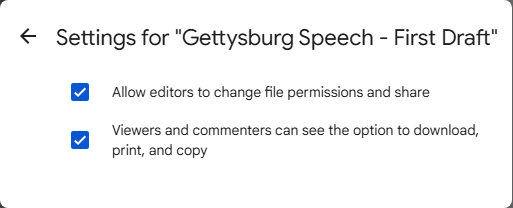
Unchecking these boxes curbs some of the default permissions for editors, viewers, and commenters.
Howard Wen / Foundry
Set an expiration date
Under a Google Workspace plan, you can also deny access to a person you’ve shared your document with on a specified date.
Click the down arrow to the right of a collaborator’s name and select Add expiration. Then, to the right of “Access expires…,” click the pencil icon and select an expiration date (and time if you want) on the pop-up calendar. It can be within one year of the current date.
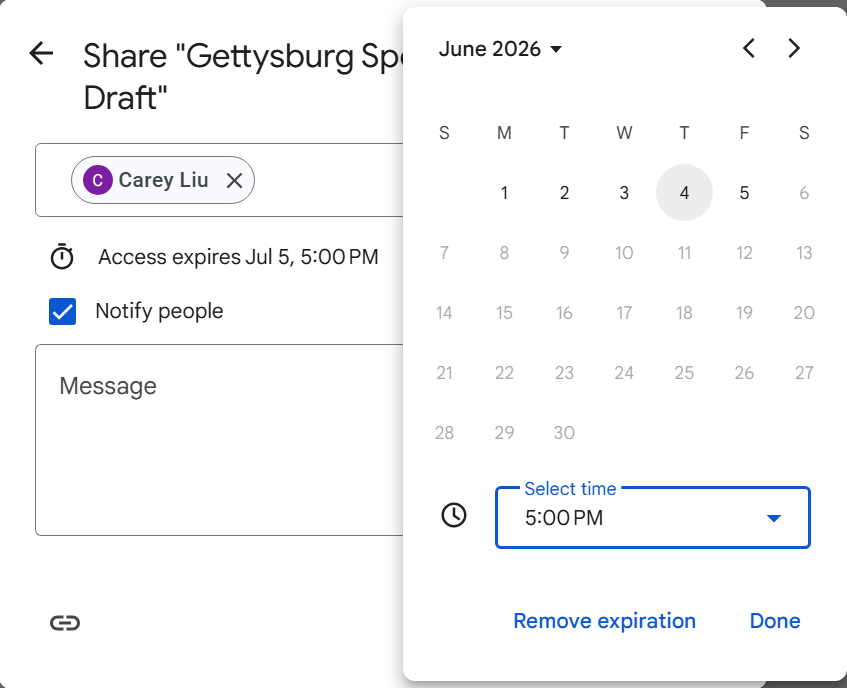
Setting an expiration date for a person’s access to a document.
Howard Wen / Foundry
Share your document publicly (anyone can access it)
At the bottom of the Share pane is a Copy link button that you can click to copy the link to your document. By default, this link is restricted to those you invite to the document.
To change it to a public link: Click Restricted and select Anyone with the link from the dropdown menu.

Changing permissions for a public link to a document.
Howard Wen / Foundry
By default, this link has Viewer access assigned to it. To allow anyone with the link to comment on or edit your document: Click the Viewer dropdown to the right and then select Commenter or Editor.
After you’ve made your above selections, click the Copy link button. You can now paste this link to your document into an email, direct message, or document, or post it on a public forum or social media. Remember that anyone who sees and clicks this link will be able to access your document.
To turn off the public link to your document, reopen the Share pane and click Anyone with the link. From the dropdown that opens, select Restricted. Then click the Done button.
Status of your shared documents
On your Google Drive or Google Docs home screen, your documents that are being shared either privately with others or as public links are marked by an icon of two silhouetted heads. (If you have the home screen of Google Drive set to “Grid layout,” this icon won’t appear with the thumbnail or filename of a shared document.)
The double silhouette icon to the right indicates that this is a shared document.
Howard Wen / Foundry
Collaborate on your document
The people you’ve shared your document with can collaborate with you on it if they’ve been designated as an Editor or Commenter. See “How to collaborate on a document” in our Google Drive collaboration guide for step-by-step instructions on how to add and review comments, edit a document, and collaborate on a document in real time.
One thing that can’t be stressed enough is how helpful it is if you and your collaborators use Suggesting mode. (Commenters will automatically be in Suggesting mode when they open the document, but Editors need to turn it on by clicking the pencil icon at the upper right and selecting Suggesting.)
If multiple people make changes to your document in Editing mode, it can become difficult to keep track of who did what. Under Suggesting mode, though, each collaborator’s text additions appear in a different color. So if they add an image, the border of that image will be the same color as their text color. Anything they delete will have a strikethrough in their assigned color.
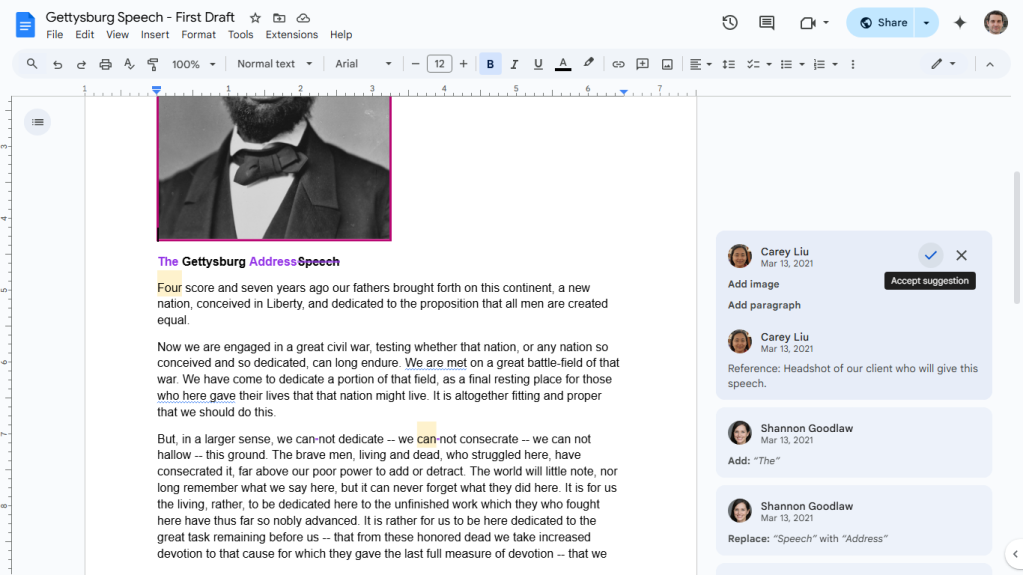
Suggesting mode makes it easy to see who made each change to a shared document.
Howard Wen / Foundry
Note cards will appear to the right of your document; each shows a suggested change made to your document (and by whom and when the change happened). To accept the suggestion on a card, click the checkmark; to reject it, click the X.
To view your document with or without all the edits suggested by your collaborators: Click Tools > Review suggested edits from the top menu bar. A box will open at the upper-right corner. To view your document with the suggested edits merged in, click the Show suggested edits dropdown and select Preview “Accept all.” To view without the suggested edits, select Preview “Reject all.”
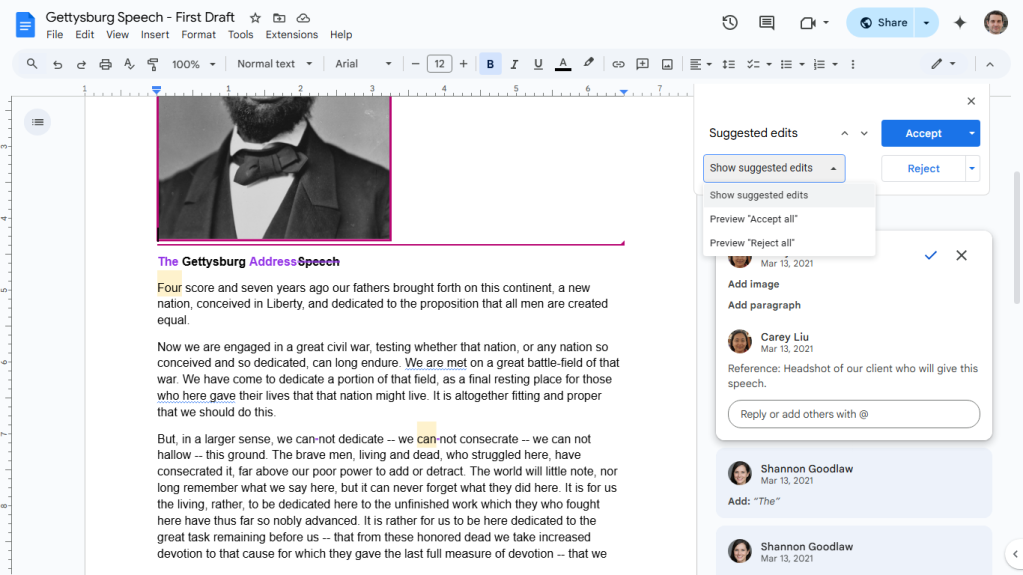
Reviewing suggested changes.
Howard Wen / Foundry
If you want to accept or reject all suggestions at once without going through them one by one, you can click the Accept All or Reject All buttons on this pane.
Whenever your document gets a suggested edit by a collaborator, an updated tally appears next to its filename, or on the upper-right of its thumbnail, on your Google Docs or Google Drive home screen.
Recover older versions of a document
Mistakes happen, and you may want to undo changes you or others have made to a document. To look up older versions of an open document, click File > Version history > See version history.
A panel opens on the right that shows a list of older versions of your document, organized by date and time. To see what an earlier version of the doc looks like, click its date or version name in the list. That version will appear in the main window.
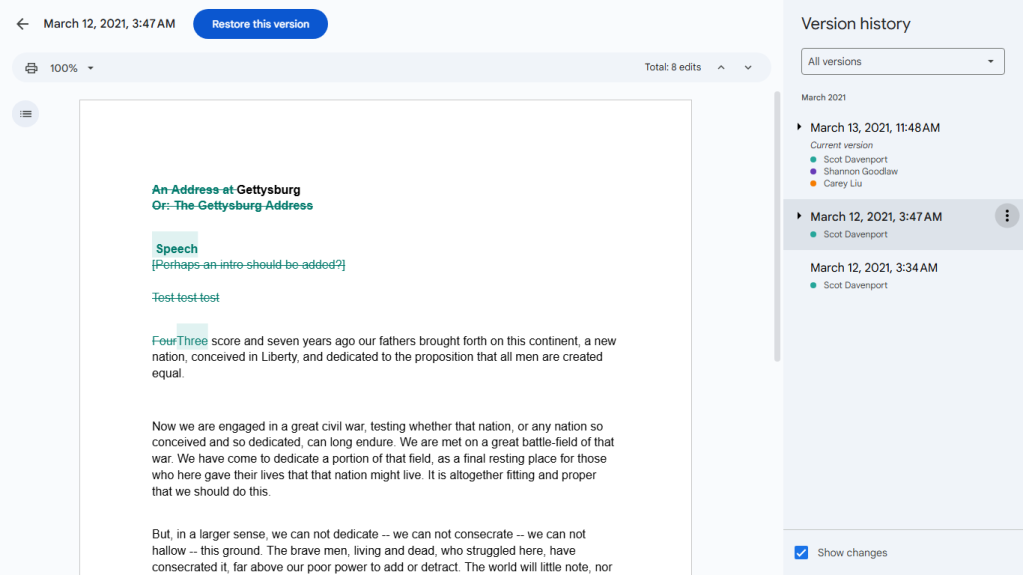
Viewing an earlier version of a document.
Howard Wen / Foundry
If you want to use this older version to replace the current version of your document, click the blue Restore this version button at the upper-left of the screen. This restored version will then appear at the top of the version history list.
If you want to give an older version a unique name, click its date. You’ll be prompted to type in words to replace the date. The version’s date and time will then appear in smaller type underneath its new name.
Download and export your document to Word or PDF
You can download a document and convert it to PDF, .docx (if it’s not already a Word document), or another text format such as OpenDocument Format (.odt), Plain Text (.txt) or Rich Text Format (.rtf).
With the document open, select File > Download from the top menu bar and choose a file format. The document will be saved to your PC’s storage drive in that format.

Downloading and converting a document to Word format.
Howard Wen / Foundry
Alternatively, you can select File > Email and then pick either Email this file or Email collaborators. This action will open a panel that lets you email your document as an attachment. PDF is the default, but you can click the PDF dropdown and choose Word or another format.
A third option under File > Email is Email draft. This inserts the Email draft building block discussed earlier in the story.
Use the Google Docs mobile app
The Docs mobile apps for Android, iPhone, and iPad have a simplified interface to accommodate small touchscreens. Except for version history, the same features described in this guide are in the mobile apps.
For example, through the Docs mobile apps, you can share documents (see “How to use Google Drive for collaboration” for instructions) and work on them with other people. This includes doing so under Suggesting mode.
Toolbars along the top and bottom of the app let you take actions such as formatting text and inserting images or tables. Clicking the three-dot icon at the far right of the top toolbar opens more options including turning on Suggesting mode, running spell check, and sharing your document.
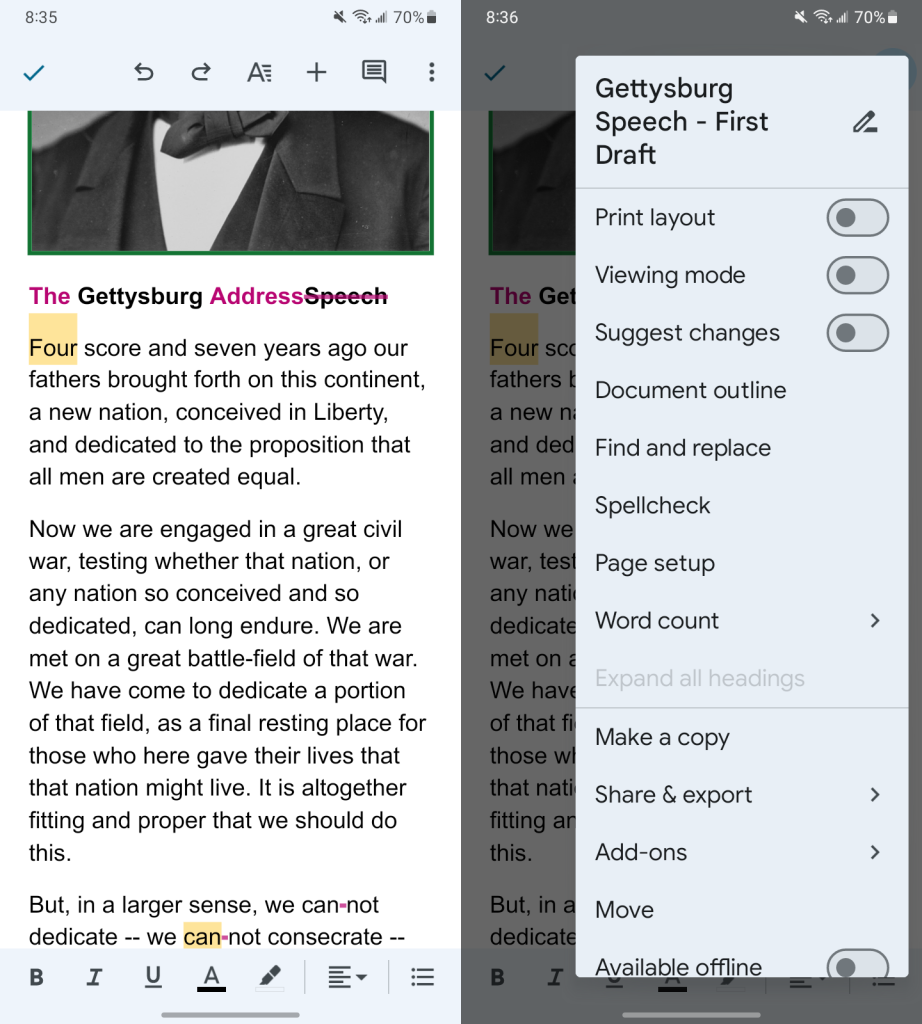
Using the Google Docs Android app.
Howard Wen / Foundry
It can be tedious to work on a document on a small phone screen, but the Docs mobile app is handy for making quick edits or keeping up to date on changes to your document made by other people. Any changes you make to a document through the mobile app are automatically saved to your Google Drive. They will show up the next time you open the document from the Google Docs or Google Drive home screen in your PC’s web browser.
Use keyboard shortcuts
Save time in Google Docs by using keyboard shortcuts to execute tasks. Below are some of the most useful shortcuts. For more, select Help > Keyboard shortcuts from the top menu bar in Google Docs, or see Google’s extensive list of Google Docs keyboard shortcuts.
Handy Google Docs keyboard shortcuts
| BASICS | ||
| Action | Chrome OS / Windows shortcut | macOS shortcut |
| Copy | Ctrl-C | ⌘-C |
| Cut | Ctrl-X | ⌘-X |
| Paste | Ctrl-V | ⌘-V |
| Undo | Ctrl-Z | ⌘-Z |
| Redo | Ctrl-Y | ⌘-Y |
| Insert or edit link | Ctrl-K | ⌘-K |
| Open link | Alt-Enter | Option-Enter |
| Find | Ctrl-F | ⌘-F |
| Find and replace | Ctrl-H | ⌘-Shift-H |
| Select all | Ctrl-A | ⌘-A |
| Insert comment | Ctrl-Alt-M | ⌘-Option-M |
| Check spelling and grammar | Ctrl-Alt-X | ⌘-Option-X |
| Open dictionary | Ctrl-Shift-Y | ⌘-Shift-Y |
| Ctrl-P | ⌘-P | |
| TEXT AND PARAGRAPH FORMATTING | ||
| Action | Chrome OS / Windows shortcut | macOS shortcut |
| Bold | Ctrl-B | ⌘-B |
| Italicize | Ctrl-I | ⌘-I |
| Underline | Ctrl-U | ⌘-U |
| Numbered list | Ctrl-Shift-7 | ⌘-Shift-7 |
| Bulleted list | Ctrl-Shift-8 | ⌘-Shift-8 |
| Align text left | Ctrl-Shift-L | ⌘-Shift-L |
| Align text right | Ctrl-Shift-R | ⌘-Shift-R |
| Copy text formatting | Ctrl-Alt-C | ⌘-Option-C |
| Paste text formatting | Ctrl-Alt-V | ⌘-Option-V |
This article was originally published in May 2019 and most recently updated in June 2025.
See more Google Workspace tips and tutorials