
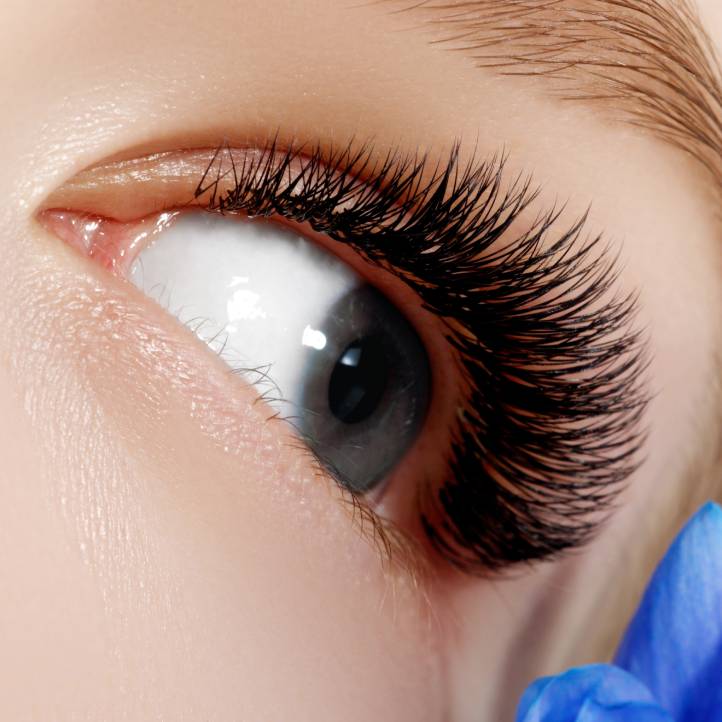

Lashes. They’re small, fluttery, and somehow wield the power of a thousand outfit upgrades. One moment you’re bare-faced at brunch, and the next—BAM!—you’re giving full glam energy with just a swipe and a stick. But let’s not pretend false lashes are foolproof. Because when they flop? They really flop. We’re talking lash bands lifting mid-convo, inner corners stabbing like tiny sabers, and glue blobs bigger than your ambition in 2014.

So before you end up looking like a budget Bond villain or a YouTube “before” picture, let’s break down the most common false lash mistakes—and how to fix them like a lash legend.
MISTAKE #1: Skipping the Trim and Hoping for the Best
THE TEA:
Lashes don’t come one-size-fits-all. So if you’re slapping on a full strip without trimming, you’re probably dealing with inner corner chaos and outer corner droopage. Not cute. Not fluttery. Just…floppy.
THE FIX:
Measure the lash strip against your natural lash line before applying glue. Snip from the outer end (where lashes are longer), not the inner corner, to maintain the natural flare. We recommend the DYSILK volume false lashes because they are easy to adjust.
MISTAKE #2: Overloading on Lash Glue Like It’s Frosting
THE TEA:
More glue ≠ more security. If you’re globbing glue on like it’s cake icing, you’re asking for a goopy mess. Not only will it smear your eyeshadow masterpiece, but it can also cause the strip to slide, shift, or straight-up escape.
THE FIX:
Apply a thin, even layer along the lash band. Pay extra attention to the ends—that’s where lifting usually starts. Let it dry for 30 seconds or until tacky before applying. This is not the time for impatience, babes.
MISTAKE #3: Sticking Them On Too Soon (A.K.A. The Premature Stickuation)
THE TEA:
Ever wonder why your lashes won’t stay put? You might be applying them before the glue has set enough. It’s like trying to build IKEA furniture before the screws are in—it just won’t hold.
THE FIX:
Once you’ve applied the glue, wait at least 30–40 seconds. Look for a clear-to-tacky change (most white glues turn bluish-clear). If it’s too wet, it won’t grip. If it’s too dry, it won’t bond. Like most things in life—timing is everything.
MISTAKE #4: Applying Lashes to Dry, Uncurled, Naked Lashes
THE TEA:
Your natural lashes are the support system here. If they’re pointing straight down or dusty from foundation fallout, they’re not holding anything up.
THE FIX:
Start by curling your natural lashes and applying a thin coat of mascara to give structure. This helps false lashes blend seamlessly and prevents that awkward double-lash-layer look. It’s like primer, but for your peepers.
MISTAKE #5: Not Pressing Them In
THE TEA:
Just setting the strip on your lash line isn’t enough. If you don’t press the falsies into your natural lashes, they’ll look like they’re floating above your eyes like awkward caterpillars.
THE FIX:
Once the lashes are on, use tweezers or a lash applicator to press the strip into your lash line—gently but firmly. Then use your fingers or a lash tool to pinch the false lashes and your real lashes together. This creates that seamless, “are those real?!” finish.
MISTAKE #6: Choosing the Wrong Style for Your Eye Shape
THE TEA:
The boldest lash in the box isn’t always your best friend. If your lashes are overwhelming your eyes or making them look smaller, it might not be you—it might be the style.
THE FIX:
Tailor your lash game to your eye shape:
- Almond eyes: Almost anything goes—lucky you!
- Hooded eyes: Look for lashes with a light, crisscross pattern and a bit of lift in the center.
- Round eyes: Wispy styles with a natural flare work best.
- Monolids: Go for lightweight, fluttery styles that build length gradually.
MISTAKE #7: Not Cleaning and Reusing Lashes Properly
THE TEA:
False lashes are an investment. But if you’re tossing them after one wear or storing them like crusty socks in your purse, you’re cutting their lifespan short.
THE FIX:
Remove lashes gently from the outer corner. Use a cotton swab and oil-free makeup remover to clean off the glue. Then store them in their original case to maintain their shape. High-quality lashes can last up to 20 wears with care!
BONUS MISTAKE: Using Lashes That Look Like 2013 Called and Wants Its Drama Back
THE TEA:
You know the ones—super thick, overly dramatic, shiny plastic nightmares that scream “Halloween but make it Thursday.”
THE FIX:
Today’s lash looks are all about texture, wisp, and believability. Think lashes that could maybe be real if you squint. Look for lightweight materials (like faux mink or silk), invisible bands, and fluttery volume—not density.
Final Flutter Thoughts 💭
False lashes can be your beauty BFF or your worst enemy. But with a little prep, the right tools, and a touch of lash wisdom, you’ll go from lash catastrophe to lash goddess faster than you can say “Where’s my glue?!”
Remember: trim with intention, glue with restraint, apply with patience, and clean like they’re couture. Your future flutter is counting on you.
Now blink twice if you’re ready to conquer the lash game like a total pro.
Also Read
How to Apply 3D Mink Eyelashes
**This is a guest post and does not belong to khadija**