
Meet the Japanese Egg Sandwich, known as Tamago Sando—the creamy, dreamy egg salad sandwich that’s become a cult favorite in Japan’s convenience stores 7-11.

In this post, I am sharing with you the secrets behind Tamago Sando’s irresistible texture and flavor, and a step-by-step guide to make this delightful japanese egg sandwich 7-11 right in your own kitchen.
What is Tamago Sando? (Japanese Egg Sando Explained)
Tamago Sando is a classic Japanese egg sandwich that takes a simple egg salad and elevates it with soft, crustless milk bread known locally as shokupan or Hokkaido. The name of this Japanese sandwich itself is a blend of Japanese and English: “tamago” means egg, and “sando” is short for sandwich.
You can find this snack easily at most Japanese konbini (convenience stores). This egg sandwich is loved for its delicate balance of flavors and textures.
Why Japan’s Egg Sandwich Is So Popular
Unlike the often chunky and tangy American egg salad, the Japanese Egg Sandwich is renowned for its smooth, refined flavor. The secret lies in the use of Kewpie Japanese mayonnaise which has a richer, sweeter taste and the ultra-soft shokupan bread that holds the egg mayo filling perfectly.
Social media has exploded with images of this sandwich, with renowned food figures even praising its “inexplicable deliciousness.” What I love most about Tamago sand is its a blend of quality ingredients and the fact that it is so easy to make has captured the hearts (and taste buds) of food lovers across the globe.
Ingredients For Japanese Egg Sando
Making a perfect Tamago Sando starts with quality ingredients. You need only a few ingredients but each one is important to create that melt-in-your-mouth texture and delicate flavour.
Eggs The Star of the Show
- Large, fresh eggs: Choose free-range or high-quality eggs for richer yolks.
- Tip: Bring eggs to room temperature before boiling for even cooking.
Japanese Mayonnaise (Kewpie)
- Kewpie Japanese mayonnaise: Its creamy, tangy-sweet flavor is key to make that signature egg salad.
- Note: If you can’t find Kewpie, you can enhance regular mayo with a pinch of sugar and a dash of rice vinegar.
Japanese Milk Bread (Shokupan)
- Shokupan: This soft, pillowy bread should be used without the crust for an authentic experience.
- Substitution: If shokupan isn’t available, you can substitute with a soft brioche or white sandwich bread, just trim off the crusts.
Other Ingredients & Seasonings
- Salt and pepper to taste
- A pinch of sugar to balance flavors
- Optional: A dab of mustard for a subtle kick. I don’t add because I love the taste of kewpie mayo so I keep it simple.
How to Make Japanese Egg Sandwich (Step-by-Step)
Here’s my step by step method to make THE Best Tamago Sando recipe that will surely impress your family and friends:

Step 1 – Boil the Eggs
- Place your eggs in a saucepan and cover with cold water.
- Bring to a boil, then lower the heat and simmer for about 10 minutes for firm, fully cooked eggs. Optional: For a slightly creamier texture, try boiling one or two eggs for 8 minutes to achieve a jammy yolk.
- Immediately transfer the eggs to an ice bath to stop further cooking and make peeling easier.

Step 2 – Prepare the Egg Salad Filling
- Peel the cooled eggs carefully.
- Gently mash the egg yolks using a fork or sieve for an ultra-smooth texture.
- Add about ¼ cup of Kewpie Japanese mayonnaise to the mashed yolks.
- Season with salt, pepper, and a pinch of sugar. If desired, mix in a small amount of mustard for extra flavor.
- Chop the egg whites finely and fold them into the yolk mixture. The aim is a creamy, well-blended filling that’s spreadable but not runny.

Step 3 – Assemble the Sandwich
- Lay out two slices of shokupan. If using regular bread, remove the crusts to maintain a soft texture.
- Evenly spread a generous layer of the egg salad filling on one slice. Tip: Spread the filling about ½-inch thick to ensure every bite is packed with flavor.
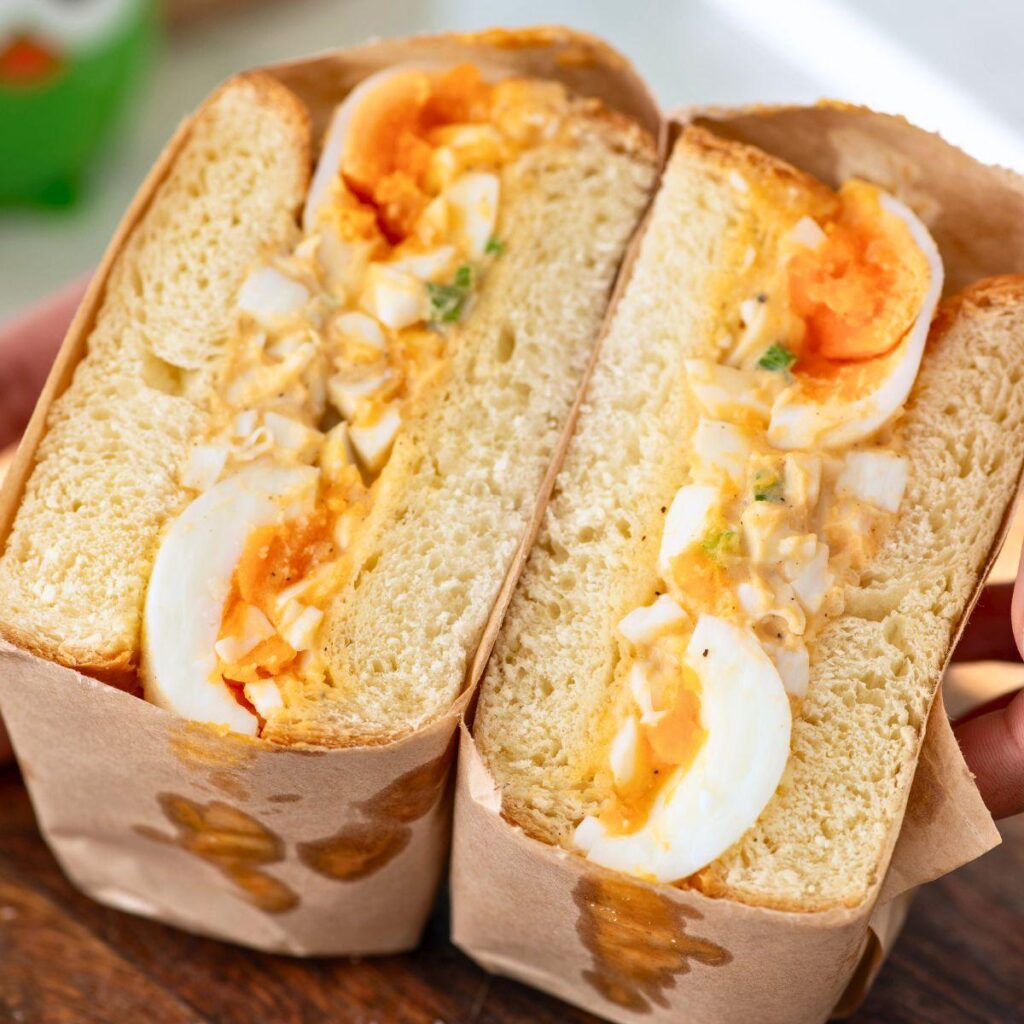
- For a gourmet twist, you can place a halved soft-boiled egg in the center before closing the sandwich.
- Place the second slice on top and press gently to compact the sandwich.
- Using a sharp knife (wiping it between cuts), slice the sandwich in half or into thirds.

Step 4 – Serve and Enjoy
- Serve immediately while the bread is soft and the filling is fresh.
- Enjoy as a light meal, snack, or pack it in a bento box for lunch.
Tips for the Best Tamago Sando
- Use room-temperature eggs: They cook more evenly and peel easier.
- Peel eggs under running water: This helps remove shells without damaging the smooth surface.
- Sieve the yolks: Achieves an ultra-smooth filling by eliminating lumps.
- Moderate the mayo: Too much can make the sandwich soggy; aim for a creamy yet balanced consistency.
- Let the sandwich rest: Allow it to sit for a minute after assembling so that the flavors meld perfectly.
These insider tips ensure your Tamago Sando stands out, offering the perfect balance of texture and flavor every time.
Variations and Serving Suggestions
While the classic Japanese Egg Sandwich is a masterpiece on its own, feel free to experiment:
- Add Crunch: Insert a few thin slices of cucumber for a refreshing twist.
- Gourmet Touch: Drizzle a tiny amount of truffle oil or sprinkle a pinch of togarashi for a modern spin.
- Spicy Kick: Mix in a dash of Japanese karashi mustard with your egg salad for extra heat.
- Serving Ideas: Enjoy your sandwich with a light salad, or pack it in a bento box for a convenient lunch option. Though best served fresh, if you need to store it, wrap tightly and refrigerate for up to 24 hours.
Frequently Asked Questions
What does “Tamago Sando” mean?
“Tamago” means egg, and “sando” is short for sandwich in Japanese. Together, they describe the iconic egg sandwich that is as simple as it is delicious.
How is a Japanese egg sandwich different from an American egg salad sandwich?
The Japanese Egg Sandwich emphasizes simplicity. It uses just egg, Kewpie mayonnaise, and minimal seasoning—no celery, pickles, or extra herbs. The soft, crustless shokupan further enhances the sandwich’s delicate texture, setting it apart from the more robust American version.
Can I use regular mayonnaise instead of Kewpie?
Yes, you can use regular mayonnaise. However, to mimic the distinctive flavor of Kewpie, add a pinch of sugar and a dash of rice vinegar (or a small amount of Dijon mustard) to regular mayo.
What’s the best bread substitute if I can’t find Japanese milk bread?
If shokupan isn’t available, try a soft brioche or any high-quality white sandwich bread. Just remember to trim off the crusts to achieve that signature soft texture.
How do I store a Tamago Sando?
For best results, enjoy your Tamago Sando fresh. If you need to store it, wrap the sandwich tightly in plastic wrap and refrigerate for up to 24 hours. Note that the bread may firm up slightly when refrigerated.
Now you have everything you need to recreate the famous Japanese Egg Sandwich (Tamago Sando) at home. With its creamy egg salad, soft milk bread, and a few expert tips, this simple yet sophisticated snack is sure to become a staple in your kitchen. Give it a try and share your creative variations in the comments below!
More Sandwich Recipes
Love sandwiches ? Check out my other Sandwich recipes:
If You like this recipe and made it Please rate the recipe. It helps us to reach more people. For the Latest updates Subscribe to Rekha’s Whatsapp. You can follow me on Instagram, Facebook, Youtube, Pinterest for more food inspirations.

Easy Japanese Egg Sandwich (Tamago Sando)
Japanese Egg Sandwich, or Tamago Sando—a rich and creamy egg salad sandwich is a cult favorite in Japan’s 7-Eleven stores. This guide reveals the secrets behind its irresistible texture and flavor, along with a step-by-step recipe to recreate this iconic sandwich at home!
- 3 large eggs
- 2 slices Japanese milk bread Shokupan
- 1 ½ tablespoons Japanese mayonnaise Kewpie mayonnaise
- ¼ teaspoon salt
- ⅛ teaspoon pepper
- 1 teaspoon chives – chopped optional
Step 1 – Boil the Eggs
-
Place your eggs in a saucepan and cover with cold water.
-
Bring to a boil, then lower the heat and simmer for about 10 minutes for firm, fully cooked eggs. Optional: For a slightly creamier texture, try boiling one or two eggs for 8 minutes to achieve a jammy yolk.
-
Immediately transfer the eggs to an ice bath to stop further cooking and make peeling easier.
Step 2 – Prepare the Egg Salad Filling
-
Peel the cooled eggs carefully.
-
Gently mash the egg yolks using a fork or sieve for an ultra-smooth texture.
-
Add about ¼ cup of Kewpie Japanese mayonnaise to the mashed yolks.
1 ½ tablespoons Japanese mayonnaise
-
Season with salt, pepper, and a pinch of sugar. If desired, mix in a small amount of mustard for extra flavor.
¼ teaspoon salt, ⅛ teaspoon pepper
-
Chop the egg whites finely and fold them into the yolk mixture. The aim is a creamy, well-blended filling that’s spreadable but not runny.
Step 3 – Assemble the Sandwich
-
Lay out two slices of shokupan. If using regular bread, remove the crusts to maintain a soft texture.
2 slices Japanese milk bread
-
Evenly spread a generous layer of the egg salad filling on one slice. Tip: Spread the filling about ½-inch thick to ensure every bite is packed with flavor.
-
For a gourmet twist, you can place a halved soft-boiled egg in the center before closing the sandwich.
-
Place the second slice on top and press gently to compact the sandwich.
-
Using a sharp knife (wiping it between cuts), slice the sandwich in half or into thirds.
Step 4 – Serve and Enjoy
-
Serve immediately while the bread is soft and the filling is fresh.
-
Enjoy as a light meal, snack, or pack it in a bento box for lunch.