
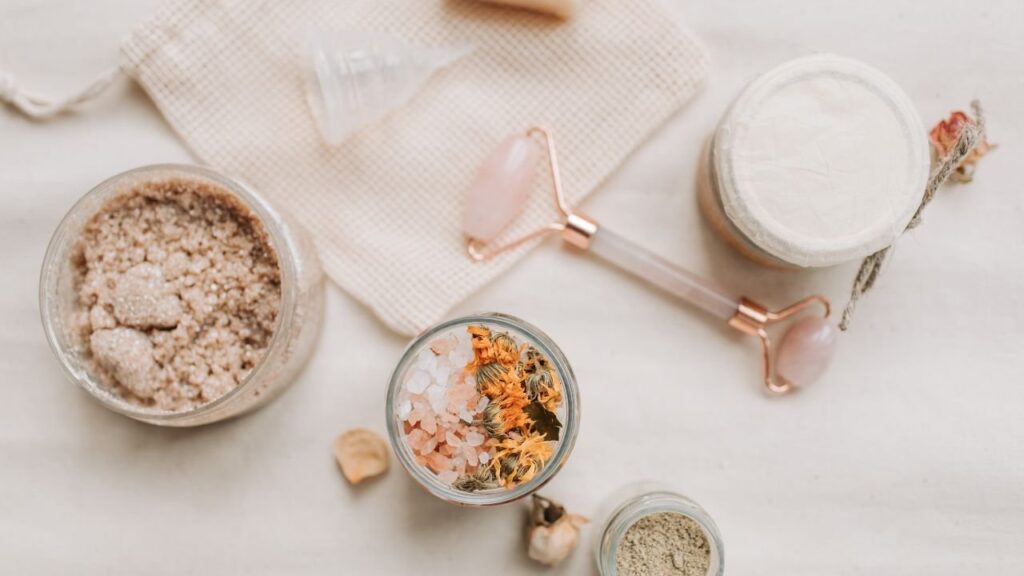
Skincare tools have recently become popular for their effective support in skin care, especially with at-home rituals.
Do you ever feel like your skincare routine just… plateaus?
You’re using the right cleansers.
You’re applying the serums.
You’re moisturizing and masking on schedule.
But still, your skin looks the same: dull, uneven, or just blah.
That’s because sometimes, good products aren’t just enough.
They need a little extra help, a boost that goes beyond your fingertips.
Skincare tools aren’t just trendy, they work.
They help your products absorb better.
They boost your blood flow.
They promote collagen production.
And most importantly, they bring visible, feel-good results with consistent use.
While skincare products make up one part of the skincare routine, the other part is the skincare tools.
Rushing to the salon for every skin treatment cannot always be possible. Also, they dig quite a hole in your pockets.
It is in times like these that skincare tools are not just a saviour but also very practical.
If you’ve been thinking, “Do I really need skincare tools?”
This blog will clear it up for you.
Let’s dive into 8 skincare tools you can easily add to your beauty routine, tools that actually make your skin feel alive again.
1. Jade Rollers
I started using jade rollers right after my marriage was fixed, i.e., in January 2024. Since then, jade rollers have been an essential part of my night skincare routine.
Jade rollers come with rounded jade stones on both sides that glide over your skin to sculpt and tone it.
While there are multiple uses of the jade rollers, they are often used for dry face massage.
Jade rollers are suitable for normal to oily skin. They have revitalising and firming benefits when used regularly.
They can also be used to spread and massage serums, natural oils, and moisturisers onto the skin. I use it for my face massage with my DIY face oil.
You can use jade rollers to apply oils and give a refreshing feeling evenly.
Jade rollers help in draining the lymphatic system & reducing tension and inflammation.
 Buy Now!
How to Use Jade Rollers?
- Apply your preferred serum, moisturiser, or facial oil on the face.
- Start at the neck and gently roll the jade roller’s bigger side upwards with light to medium pressure.
- The smaller side should be used for the under-eye area with an under-eye cream.
- Move the smaller area of the jade roller from the inner crease towards the brow bone very gently.
Best Used For: Puffiness, Inflammation, Dryness
What Not to Do with a Jade Roller?
1. Don’t use it on dirty skin
Always cleanse your face before using a jade roller. Rolling over dirt, makeup, or sunscreen can push impurities deeper into your pores, leading to breakouts or irritation.
2. Don’t roll without lubrication
Using a jade roller on dry skin can tug at your face and cause unnecessary friction. Always apply a serum or facial oil first to let the roller glide smoothly.
3. Don’t forget to clean it
Never skip cleaning your jade roller after use. Because bacteria can build up on the stone and transfer back to your skin, which completely defeats the purpose of using it for skincare in the first place.
4. Don’t apply too much pressure
More pressure doesn’t mean better results. Pressing too hard can cause inflammation or broken capillaries, especially around sensitive areas like under your eyes.
5. Don’t expect instant miracles
A jade roller is a supporting skincare tool, not a miracle device. So, don’t expect overnight transformations. With regular use, you’ll see improvements in puffiness, circulation, and product absorption, but you’ll have to give it time.
2. Rose Quartz Rollers
A rose quartz roller is made from rose quartz.
While it resembles a jade roller, it is pink in color.
It is primarily beneficial for individuals with sensitive and mature skin, as it is soothing and possesses anti-aging properties.
Rose quartz makes you feel peaceful and is often used when not feeling up to par.
Regular use of a rose quartz roller helps reduce fine lines and wrinkles.
It helps to minimise the appearance of your pores, reducing visible blood vessels and boosting blood circulation.
 Buy Now!
How to Use Rose Quartz Rollers?
- Clean and pat dry your face.
- Apply face oil and use upward and outward strokes, starting on your neck and moving upwards delicately.
- Use the narrower side of the roller above and below the eyes. The roller should move outward and upwards.
- Roll the roller until all the oil is absorbed into the skin.
- Clean the rose quartz roller with a damp cloth and store it in a cool and dry place. It is best stored in a refrigerator.
Best Used For: Wrinkles, Fine lines, and Reducing Blood Vessels
What Not to Do with a Rose Quartz Roller
1. Don’t use it on untidy skin
Just like with other skincare tools, never use your rose quartz roller without washing your face first. Rolling over untidy skin can spread bacteria and clog your pores.
2. Don’t skip applying a serum or oil
Rolling on dry skin creates friction, which can lead to redness or irritation. Always pair it with a facial oil, serum, or hydrating mist so the roller glides easily and enhances product absorption.
3. Don’t forget to clean it regularly
Many people assume crystals don’t need cleaning. But your roller picks up product residue and bacteria with every use. Thus, it is important to always clean it with a gentle soap or alcohol wipe after each use.
4. Don’t apply heavy pressure
Rose quartz is a heavier stone, so it naturally adds more pressure than jade. So, avoid pressing too hard, especially around delicate areas like your eyes, to prevent bruising or inflammation.
5. Don’t use it if it’s chipped or cracked
A cracked roller isn’t just ineffective; it can scratch your skin and cause microtears. If your rose quartz roller is damaged, replace it immediately for your skin’s safety.
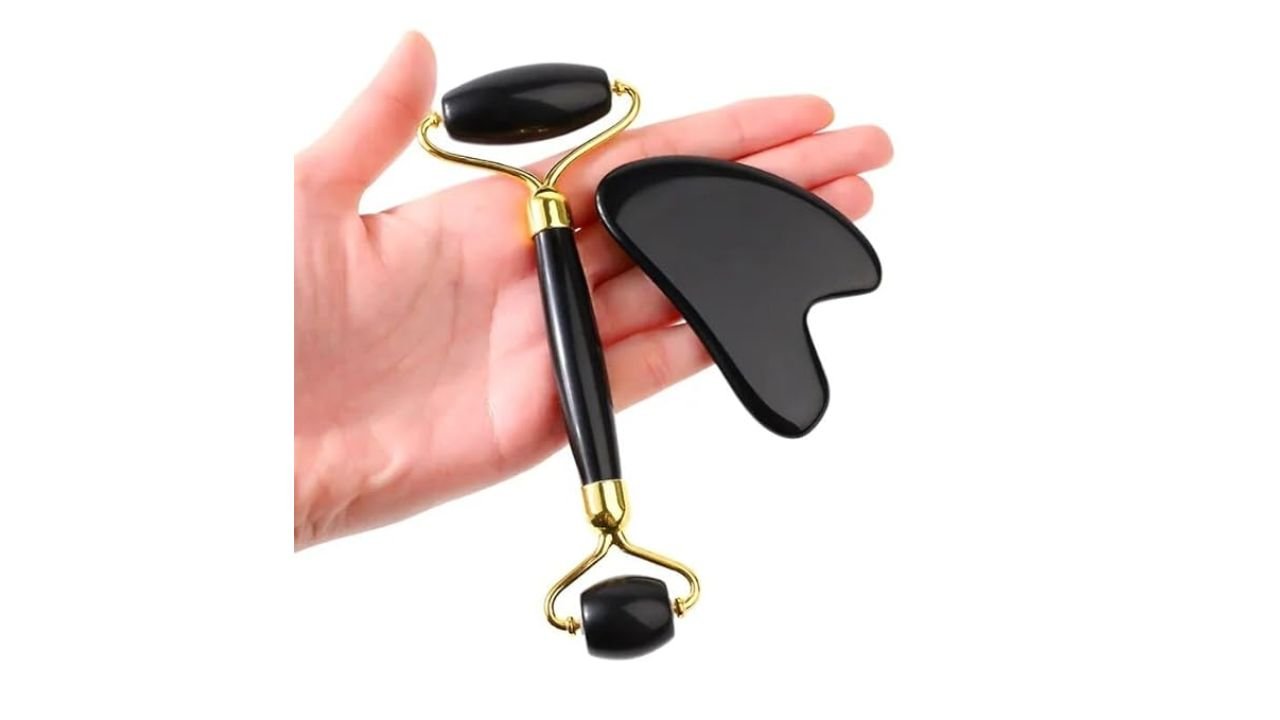
3. Gua Sha
Gua Sha originated in traditional Chinese Medicine. It means the practice of scraping the skin with a tool.
I started using it along with the jade roller, and it has been an essential in my skincare routine since then.
It encourages your blood flow, relieves tension, reduces inflammation, detoxifies the skin, and causes stagnant facial energy to move. It is especially beneficial for acne-prone skin.
Gua Sha helps shape and contour your face. It keeps the skin cool and reduces puffiness.
It can be used two to three times a week for positive results.
 Buy Now!
How to Use Gua Sha?
Depending on your preference, you can use it in the morning or the evening. In the morning, it awakens and invigorates the skin; in the evening, it relaxes it. However, I use it at night before I go to bed, and it certainly helps me to sleep better.
- First, clean your face and pat dry before you use the gua sha.
- For oily skin, apply oil-free face lotion to suit your skin type. For normal to dry skin, you can apply your preferred face oil.
- Hold the tool at a 35-45 degree angle and apply medium pressure as you move the Gua Sha upward and outward.
- Start at your collarbone and move to your earlobe. Repeat this process 3 to 5 times before moving to the next side.
- Then, use the double-edged part starting at the centre of your chin and move the tool along the jawline to the ear. Repeat the same on the other side.
- Turn the Gua Sha and use the long edge across the cheekbone to the ear before you do the same on the other side.
- For under the eyes, start under the eye and move it outwards towards the ear in a straight line.
- On the forehead, start between the eyebrows and drag the tool upward towards the hairline.
Best Used For Acne Issues, Inflammation, Detoxification
What Not to Do with a Gua Sha Tool?
1. Don’t use it on dry skin
Gua Sha should never be used on bare, dry skin. It needs a slip to glide on your skin. Skipping oil or serum can cause tugging and leave your skin red, irritated, or worse, damaged.
2. Don’t apply too much pressure
Gua Sha isn’t about force. Pressing too hard doesn’t give better results; it can bruise your skin and stress your facial muscles. Gentle, consistent strokes are all you need.
3. Don’t use it on broken or acne-prone skin
If you have active breakouts, wounds, or inflamed areas, avoid those spots. Dragging the tool over them can worsen irritation or spread bacteria.
4. Don’t rush the process
Gua Sha is a slow beauty ritual, not a quick fix. So, rushing it defeats the purpose. Thus, take your time to follow proper strokes for lymphatic drainage and sculpting benefits.
5. Don’t skip cleaning it after use
It might look clean, but your Gua Sha picks up product residue, oil, and your dead skin, too. Always wash it with soap and warm water, or a mild cleanser, after each use.
4. Black Obsidian Face Rollers
Black obsidian face rollers retain warmth and have been used for over a thousand years to soothe the skin.
Since they retain warmth, they are used for decongesting the skin and for blemish-prone skin.
The warmth of these face rollers stimulates the lymphatic system, aiding in better blood circulation.
They also reduce puffiness on the face, relieve jaw and facial tension, and help give the skin a glow.
The black obsidian face rollers are believed to protect against stress and negativity.
These rollers are used to apply serums, when stressed, as a midday pick-me-up, to apply moisturiser, and for a relaxing massage.
 Buy Now!
How to Use Black Obsidian Face Rollers?
Place the black obsidian face rollers in a glass of warm water and let it sit for a while before using it.
- Place the black obsidian face roller in the middle of your face and gently roll across your cheeks towards your ear.
- Return to the starting position and repeat the same on the other side.
- Move below the lower lip and roll the face roller across the chin.
- Turn the roller and use the smaller end to roll the roller from the eyebrows towards the hairline.
Best Used For Stress, Blemishes, Acne
What Not to Do with a Black Obsidian Face Roller?
1. Don’t store it without cleansing it
Obsidian is known for its detoxifying energy, but if you don’t clean your roller after use, it ends up holding onto the very toxins and residue you’re trying to remove. Always cleanse it with a soft cloth and mild soap.
2. Don’t skip warming it before use
Unlike jade or rose quartz, Black Obsidian naturally holds heat. You can use it warm, but avoid applying it cold as it may feel harsh and cause tension. Place it in warm (not hot) water for a few minutes for a relaxing experience
3. Don’t expect instant results
It’s easy to fall for trends and hope this crystal roller will transform your skin overnight. But consistency is the secret ingredient among all. Use it regularly in your routine rather than expecting immediate miracles.
4. Don’t press down too hard
Just like with other face tools, pressure won’t speed up the benefits. In fact, too much pressure with obsidian can lead to broken capillaries. Take thin light strokes, like a feather across the skin.
5. Don’t use it directly after exfoliating
Obsidian rollers are energizing, but using them right after exfoliating, when your skin barrier is sensitive, can cause irritation. So, wait a few hours or use it during your night routine when your skin has settled.
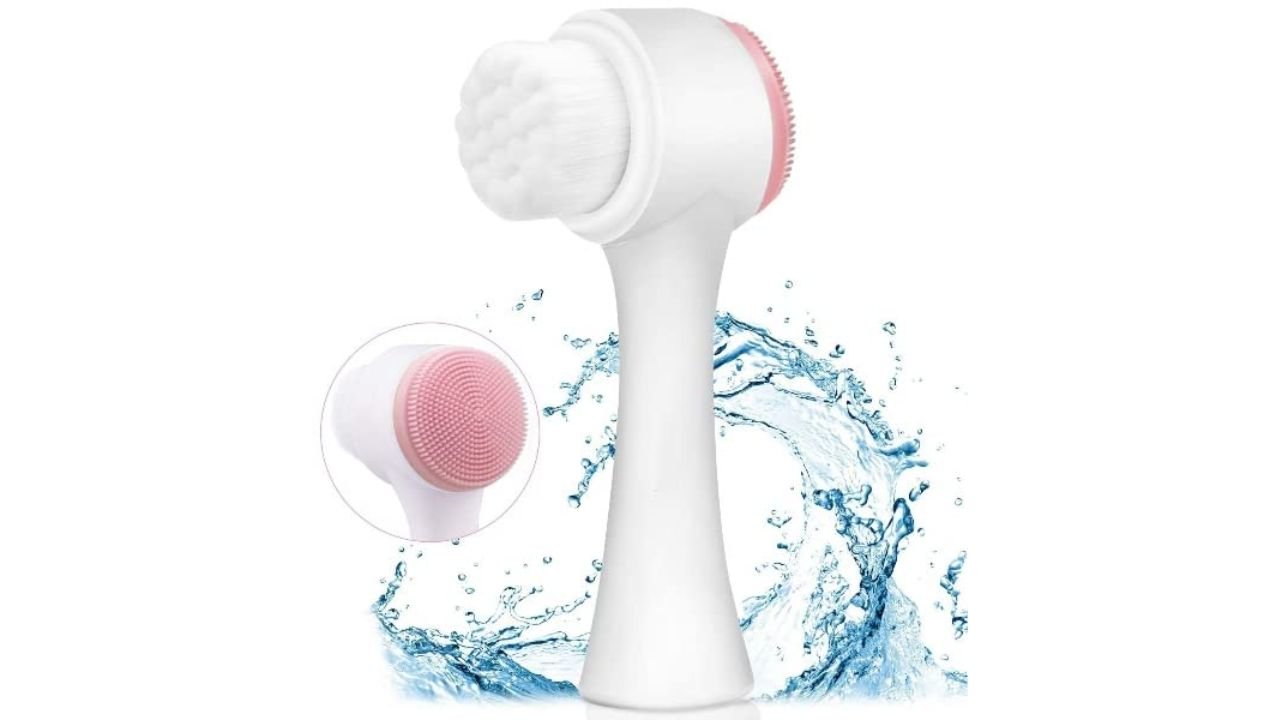
5. Face Cleansing Brush
Face cleansing brushes are available in many types and at a wide range of costs. They are available for both dry cleansing and wet cleansing.
I have been using my face cleaning brush for a long time now. I received it in my Himalaya Facial Kit almost 6 years ago, and it has been going pretty great since then.
Apart from cleansing the skin, these brushes evenly spread the cream better than spreading it with your hands.
These brushes exfoliate the skin, which helps restore its natural glow. Regular exfoliation keeps the skin free of dirt and oil and makes it smooth.
There are different types of cleansing brushes for different skin types, such as brushes for sensitive skin, oily skin, and normal skin.
 Buy Now!
How to Use a Face Cleansing Brush?
- Wet your skin and dab the water off. Apply a few drops of cleanser on the brush.
- Rotate the brush in a circular motion, moving from the neck to the hairline.
- Continue to massage with the brush for a minute or so.
- Once done, rinse with lukewarm water and pat dry. Rinse the brush well, too, to avoid contamination.
- Follow up the cleansing routine with toner, serum, moisturiser, and eye cream.
What Not to Do with a Face Cleansing Brush?
1. Don’t use it every single day
It may feel tempting to scrub away every bit of oil and dirt daily, but overusing skincare tools like a face cleaning brush can damage your skin barrier. Limit use to 2–3 times a week, especially if you have sensitive or dry skin.
2. Don’t skip cleaning the brush itself
The irony? A dirty brush defeats the purpose of cleansing. Bacteria builds up fast, so make it a habit to rinse and air-dry the brush after every use and deep-clean it weekly.
3. Don’t use it on broken or irritated skin
If you’re having an active breakout, rash, or sunburn, skip the brush. The bristles can worsen inflammation and delay healing. Let your skin rest.
4. Don’t apply too much pressure
A face cleansing brush is not a scrubbing tool. Harsh pressure can cause microtears in the skin. So, let the brush glide gently. Its movement does the work, not your force.
5. Don’t use it with exfoliating cleansers
Using a physical tool and a gritty or acid-based cleanser at the same time? A fast track to redness, dryness, and irritation. Pair your brush with a gentle, non-exfoliating face wash instead.
6. Pore Extractor
Blackheads and whiteheads are common types of skin conditions that can form on any part of the body. For me, it’s my nose. For you, it could be your chin.
They are formed due to sebum secretion coupled with dead skin cells. They build up on the skin and clog the skin’s pores.
The pore extractor gives faster results as it physically removes the blackheads and whiteheads.
The extractors come with different heads or needles. The different types of extractors are:
- Round tip extractor
- Spoon extractor
- Lancet extractor
- Acne tweezers
- Blackhead vacuum

How to Use the Pore Extractor?
Before using a pore extractor, you can either steam your face or apply a warm compress to the affected area. This softens the pores and makes it easy to extract the acne.
- Clean the extractor with alcohol.
- Using smaller loops makes applying pressure on the blackhead or whitehead easier. The bigger loop can be used for a larger breakout.
- Place the loop on the blackhead or whitehead and gently press it. The dead skin, sebum, and pus will come out.
- If nothing comes out, stop for a bit. Take more steam or apply a hot compress and try again.
- If nothing comes out again, stop, as the blackhead or whitehead isn’t ready to be popped.
- Stop pressing immediately if the spot starts bleeding, and clean the sight with an antiseptic.
- Wash your face with gentle face wash and water to clean the surrounding skin of bacteria.
- Go back to your skincare routine the next day.
What Not to Do with a Pore Extractor?
1. Don’t use it without prepping your skin
Jumping straight in on dry, cold skin can cause more harm than good. Always prep your face with steam or a warm towel to open up pores and soften the debris inside. It makes the process smoother and less painful.
2. Don’t press too hard
A pore extractor is not a digging tool. Pressing too firmly can bruise your skin, cause inflammation, or even leave scars. Gentle pressure is key; you’re encouraging the buildup to come out, not forcing it.
3. Don’t use it on active acne or sensitive areas
Avoid using a pore extractor on pimples, inflamed spots, or thin areas like around your eyes. It can spread bacteria or worsen irritation. Stick to blackheads or clogged pores on tougher areas like the nose or chin.
4. Don’t skip sanitizing before and after
Think of it as a mini surgical tool; hygiene is everything. Always clean the extractor with rubbing alcohol before and after each use to prevent bacterial transfer.
5. Don’t overdo it
This is a once-a-week (or even once-in-two-weeks) ritual, not a daily one. Overusing a pore extractor can damage your skin barrier and make your pores more noticeable over time. Less is truly more here.
7. Silicone Spatula
A silicone spatula is a practical, quick, and easy solution for evenly applying all types of masks.
The design of the spatula helps in targeted application, and it is mess-free. It can be used both for mixing the mask ingredients and for application.
The beauty of the silicone spatula is that it can be used for any type of face mask, like gel mask, mud mask, cream mask, or even liquid mask.
The silicone spatula is hygienic and doesn’t cause any skin irritation. It is easy to clean and store for later use. Clean it with warm water and gentle soap. Pat dry and store.
Unlike the brushes, the face mask doesn’t stick to the spatula, so there is no wastage.
 Buy Now!
How to Use a Silicone Spatula?
Take a mask on the spatula directly without touching the mask, keeping it free of any contamination.
Spread the mask evenly on the skin with the spatula. Avoid the lips and the eye areas. Even application of the face mask ensures the nutrients from the mask are fully absorbed into the skin.
What Not to Do with a Silicone Spatula?
1. Don’t use the same spatula for every product
While it might be tempting to grab the same spatula for all your masks, mixing different formulas without cleaning can lead to product contamination. Stick to one spatula per product, or clean it thoroughly in between.
2. Don’t double-dip into your jar
Even with a spatula, hygiene matters. Avoid dipping the used spatula directly back into your mask jar. Instead, scoop the product out once, place it on the back of your hand or a clean dish, and apply from there.
3. Don’t forget to clean it after each use
Silicone skincare tools may look clean, but they can still harbor product residue and bacteria. Always wash your spatula with warm water and gentle soap after every use, and let it air dry.
4. Don’t drag it too harshly on your skin
The spatula is meant to gently glide product on, not exfoliate. Pressing too hard or dragging it aggressively can irritate your skin and defeat the purpose of a calming self-care ritual.
5. Don’t store it loosely in your skincare drawer
Tossing it in with your other tools can cause it to pick up dust, lint, or bacteria. Store your spatula in a clean pouch or container to keep it ready for your next masking session.
8. Facial Steamer
Steamers are a must-have for your beauty regimen. Steaming the face softens the skin, opens the pores, removes dead skin cells, and purges unwanted substances like sebum, etc.
The facial steamer is like an in-house spa provider, which gives your skin much-needed care from the confines of your home.
Warm steam and perspiration dilate the blood vessels and increase blood circulation. This, in turn, helps in boosting nutrient flow to the skin with added oxygen. It lends a natural, healthy glow to the skin.
Face steaming helps the skin to absorb the skin care products and gives better results.
It also helps in relieving sinus congestion and headaches caused by the sinus.
 Buy Now!
How to Use a Facial Steamer?
Go through the essential usage guide before you start using the steamer for the first time.
- Remove any makeup and clean your face well before you use the steamer.
- Use distilled water in the steamer to avoid any chemicals from the water affecting the skin. The other advantage of using distilled water is that it protects the steamer.
- Cover your head with a towel and take for no more than 8-10 minutes. Longer duration of steam can have an adverse effect on the skin.
- Add essential oils to the water while taking a steam, if you want.
- Once done, clean your face, remove blackheads or whiteheads using a pore extractor, if any. Then apply the mask and end it with a good amount of moisturiser onto the skin.
Tips For Using a Facial Steamer
- Do not use the steamer more than once a week. Overdoing it can cause damage to the skin.
- Moisturise your skin after steaming to hydrate the skin.
- Consult your dermatologist before using the steamer if you suffer from acne.
What Not to Do with a Facial Steamer?
1. Don’t steam for too long
It may feel relaxing, but overdoing it can strip your skin’s natural moisture and lead to dryness or sensitivity. Stick to 5–10 minutes max, once or twice a week.
2. Don’t use it too close to your face
Holding the steamer too close can cause burns or broken capillaries. Always keep your face at least 8–12 inches away from the nozzle, enough to feel the warmth, not the heat.
3. Don’t steam on dirty skin
Steaming opens up your pores, so if your face isn’t clean, it can allow dirt and bacteria to settle deeper. Always cleanse your face thoroughly before a steam session.
4. Don’t use it if you have active acne or rosacea
If your skin is inflamed or extra sensitive, steaming can worsen the condition. Listen to your skin. Sometimes, skipping the steam is the most caring thing you can do.
5. Don’t skip hydration afterward
Steaming preps your skin to absorb product, but if you don’t follow it with a hydrating serum or moisturizer, it can actually leave your skin drier than before.
Conclusion
Not all skincare tools are expensive or intimidating.
You might hesitate to use them, I get it. I used to feel like this until 2023.
But, keeping an open mind and going with the opportunity of using them did help me embrace them in my skincare routine.
When chosen mindfully and used consistently, they can become your personal salon at home.
Whether it’s a jade roller that depuffs your mornings or a facial steamer that opens up your tired pores, these tools help you care for your skin with intention and ease.
Remember: skincare is not just a routine. It’s a ritual.
And every ritual deserves the right tools.
So now that you know which skincare tools can elevate your glow, here’s your next step:
Read this next: 22 Simple Skin Remedies from Your Kitchen for that Summer Glow
Because sometimes, the best skincare begins in your kitchen.
FAQs
1. What skincare tools do I need?
You can start with the basics:
- Jade or Rose Quartz Roller for lymphatic drainage
- Gua Sha for sculpting and boosting blood circulation
- Face Cleansing Brush for a deeper cleanse
- Facial Steamer to open up pores
- Pore Extractor for occasional blackhead removal
Choose the tools that match your skin goals and daily routine, and don’t overcomplicate it.
2. Do skincare tools really work?
Yes, when used correctly and consistently. Skincare tools help with all the benefits I have mentioned in this blog. Also, they offer visible results over time. They’re not magic wands, but they can seriously boost your skincare game when paired with the right products.
3. How to disinfect skincare tools?
Clean your tools after every use, just as I have shared above for each tool. Remember, hygiene is key to keeping your skin healthy and irritation-free.
4. How often to use skincare products?
Here’s the frequency of your skincare products; this is something I personally follow. You can change it as per your convenience.
- Daily use: Cleanser, moisturizer, and SPF.
- 2-3 times a week: Exfoliators, masks, steaming.
- As needed: Tools like extractors or deep-cleansing brushes.
But most importantly, listen to your skin. It will tell you what it needs, listen to it, and avoid overdoing anything because moderation is key in skincare.
5. How to use skincare tools?
Each tool comes with its own technique:
- Rollers & Gua Sha: Always use on clean, moisturized skin, in upward strokes.
- Steamer: Use before applying serums or masks to open up your pores.
- Brushes: Gently glide in circles to avoid tugging your skin.
- Spatulas: Use it to apply face masks hygienically.
Start slow and gentle because consistency beats intensity, every time.