

Android’s in the midst of an ambitious reinvention — but sometimes, the most exciting new elements aren’t even connected to the actual operating system or anything Google itself is giving us.
At a time when the bulk of Google’s new-feature attention is aimed at overhyped AI technology, independent Android developers are doing some of the most interesting work that’s likely to have a immediate positive impact on our day-to-day lives.
That’s absolutely the case with the small but significant touch I want to share with you today. It’s an easily overlooked update to an outstanding Android app that opens the door to some truly transformative improvements — ones that’ll be much more helpful than what any accuracy-challenged answer engines can offer. Heck, it doesn’t even involve AI at all (in the current generative-AI-centric definition of the term, at least).
Instead, it’s a simple and extremely approachable new possibility in the area of Android automation. And embraced in the right way, it’ll make whatever Android device you’re using more efficient, less distracting, and generally just better at keeping you tuned into what actually requires your attention.
Your instant upgrade awaits. Shall we?
[Psst: Love shortcuts? My Android Shortcut Supercourse will teach you tons of time-saving tricks for your phone. Start now for free!]
Your Android automation station
The app at the center of this handy new Android automation option is a splendid power-user tool we’ve talked about before — a fantastically useful (and easy to use!) creation called BuzzKill.
The simplest way to think about BuzzKill is as a Gmail-filter-like framework for your phone’s notifications. In short, you use it to create super-simple “if this, then that”-style rules for how incoming alerts are handled — so, for instance, you might tell BuzzKill:
- If I get a Slack message with the word ‘urgent’ in it, trigger a full-screen alarm and sound to make sure I notice.
- If I get a text from my department head, have the notification sound repeat every five minutes until I acknowledge it.
- If my co-worker messages me 10 times within the span of two minutes, only alert me once.
- If I get notifications from social media apps or Google Photos during the workday, hang onto ’em and send ’em all to me at once at 5 p.m. — or even as a single summarized alert, when I can deal with such matters more efficiently and without having them create any ongoing distractions.
You get the gist. The possibilities are practically endless, and with a sliver of creative thinking, there’s all sorts of incredible stuff you can get BuzzKill to do — all with zero technical knowledge and mere minutes of effort.
The reason we’re talking about BuzzKill now, though, is that the app just recently got updated with the ability to support a new type of condition — the “if” part of the “if this, then that” equation, in other words, and the trigger that causes a certain type of behavior to occur.
Specifically, you can now ask it to detect if your phone is in your pocket or face-down on a table and then adjust how it handles specific sorts of notifications as a result.
That may seem insignificant or maybe even slightly silly on the surface, but think about the ways you could use that to your advantage. Just as a few off-the-cuff examples, you could tell BuzzKill to…
- Make an especially loud sound for any important, maybe work-related notifications that arise when your phone is in your pocket and thus a standard single ding is less likely to be noticed.
- Repeat any alerts that arrive in that context — or, perhaps, just any alerts from certain specific apps, like your Android email and messaging apps — 15 minutes later.
- Override your phone’s do-not-disturb setting and unsilence the device to make sure you hear the sound from a specific sort of high-priority alert — say, an email or message from your boss or a text from an important client.
- Create a unique custom vibration pattern for specific notifications so you can immediately identify ’em and know what they are without even having to pull your phone out of your pocket.
And onward from there. The sky really is the limit — and, unlike with other Android automation solutions, you don’t have to wade your way through a complex coding process or any sort of time-consuming, headache-inducing setup to make any of this happen.
In fact, you’ll need just a few short minutes to get your first rule going.
3 minutes to advanced Android automation
All right — ready to dive into these easy-moving automation waters?
First things first, you’ll need to download BuzzKill from the Google Play Store, if you haven’t already. The app costs four bucks up front as a single, one-time purchase — and if you’re anything like me, it’ll pay for itself and then some in no time at all.
Of note: BuzzKill doesn’t require any unusual permissions, doesn’t collect any form of data from your phone, and doesn’t have any manner of access to the internet — meaning it’d have no way of sharing your information even if it wanted to.
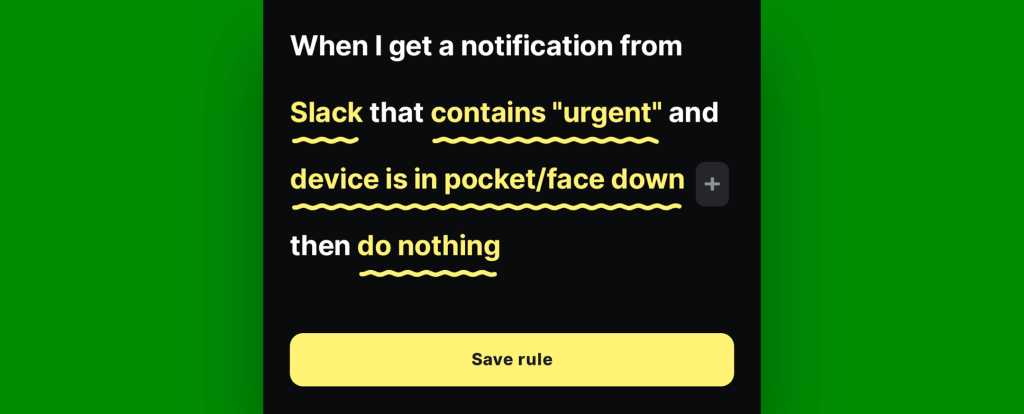
Once you open ‘er up and get through the quick initial setup, tap the “+Create rule” button in the lower-right corner of the main BuzzKill screen — and you’ll then see a screen that looks a little somethin’ like this:

JR Raphael, IDG
From there, all you’ve gotta do is tap each of those underlined phrases to fill in the blanks and create the rule you want:
- To start, tap the words “any app” and select which specific app — or apps — you want to be included.
- If you want the rule to affect only Slack, for instance, you could select it. If you want it to affect Slack, Messages, and Gmail, you could select all three. Or if you want it to apply to any app without restriction, you can just leave it as-is and not select anything at all.
- Next, tap “contains anything,” then tap “Phrase” and type in whatever specific phrase you want BuzzKill to watch for — and tap “Apply filter” to save when you’re done.
- You might use a word like “urgent,” or you might use the name of a specific contact or Slack channel. The phrase can be anything at all, as long as you’re sure it’ll appear in notifications and thus be visible to BuzzKill to detect.
- If you don’t want to limit the rule based on the exact contents of the notification and instead want it to apply to any notification within whichever apps you selected, you can skip this step and leave this field blank.
- Back on the main rule configuration screen, tap the small gray plus symbol directly next to the “contains” line we just went over and select “Filter by in pocket/face down” in the menu that appears.
JR Raphael, IDG
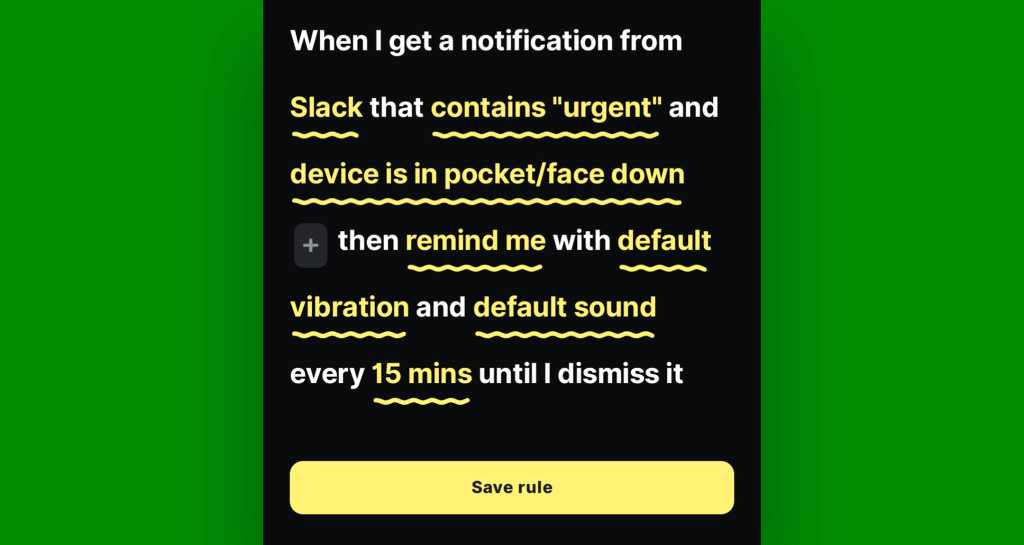
- Last but not least, tap “do nothing” and think carefully about what action you want BuzzKill to perform. Options that may be especially relevant for this purpose include:
- “Alarm,” which will cause your phone to make a specific loud sound and vibration and pop up a full-screen alert whenever the conditions are met.
- “Remind me,” which will allow you to set up a specific interval at which your phone should continue alerting you to the notification until you acknowledge it.
- “Unsilence,” which will override your phone’s do-not-disturb setting when a matching notification arrives to ensure you see it.
- “Custom alert,” which empowers you to create a unique buzzing pattern and sound to make the notification easily identifiable.
Be sure to tap the “Pick action” button at the bottom of the screen to save and confirm once you’re done, and you should then see your final rule spelled out in front of you — possibly with a few extra configurable options, depending on what action you picked.
JR Raphael, IDG
If you want to adjust any of the available options any further, tap on their words to tweak ’em as you wish. Otherwise, tap “Save rule” — and with that, your fresh slice of advanced Android automation will be silently working on your behalf and doing what you requested anytime your phone’s in your pocket and your conditions are met.

JR Raphael, IDG
This is just scratching the surface of how you can use BuzzKill to make your phone more effective. But whether you’re already an Android automation aficionado or this is your first dip into this delightfully deep ‘n’ briny ocean, you’re officially on your way to a more intelligent Android experience — with a phone that thoughtfully works for you on a genuine, not at all artificial, level.
Get six full days of advanced Android knowledge with my free Android Shortcut Supercourse. Tons of time-saving tricks await!