
![Microsoft > OneNote [Office 365]](https://harmonictimes.com/wp-content/uploads/2025/05/1670215-0-99459700-1746615490-cw_microsoft_office_365_onenote-100787150-orig.jpg)
File Printout: This also opens File Explorer. You select a PDF on your PC’s drive or OneDrive. All of the PDF’s pages will be added to the page as a series of images. When you click any of these images, eight dots appear at its sides and corners. You can click on and drag these dots to resize the image.
Spreadsheet: Like File Printout, this option lets you embed an Excel spreadsheet on the page, and you can resize it in the same way. It opens File Explorer so that you can select an Excel spreadsheet on your PC’s drive or OneDrive — or you can embed a new, blank spreadsheet.
The embedded spreadsheet is basically a large image; you can’t edit it directly on the OneNote page. To edit the spreadsheet, select it on the page and click Edit in the upper left of the spreadsheet. This will open the spreadsheet in the Excel desktop app, if you have it installed on your PC. Otherwise, it will open in the Excel web app in your default web browser.
Changes you make to the spreadsheet in Excel will (eventually) appear on the embedded version in OneNote. This is dependent on OneDrive working to sync your activity between OneNote and Excel. In my experience, the updating doesn’t happen instantly — expect a delay.
Pictures: This presents you with three ways to add a picture to a page:
- From File: You select an image file on your PC’s drive or OneDrive.
- From Camera: You snap a photo using your PC’s webcam.
- From Online: You add an image that you find via Microsoft’s Bing search engine.
Remember that the image will appear wherever your cursor is on the page when you click the Pictures button. That means you can click inside a text frame or table cell to have the image appear there.
When you click any image that’s been added to a page, eight dots appear at its sides and corners. You can click on and drag these dots to resize the image.
Page Templates: Click this to open a sidebar along the right of the screen. On it, you can select from a large variety of page templates, which are preformatted for specific uses, such as meeting notes or project to-dos. When you make a selection, a new page is created and the template is inserted onto it.
Link: You can apply a clickable web link to one or more words on the page. First, copy the web link to your Windows clipboard. Next, highlight the word or phrase on the page, then click Link. On the panel that opens, paste in the web link.
Record Audio and Record Video: A simple audio or video recording tool will appear along the top. You can record an audio or video clip if your PC has a microphone or camera. The recording will appear on the page as a shortcut to its audio or video file. Clicking it will launch playback through the appropriate media player.
Online Video: This lets you paste in a link to an online video on a site such as Giphy, Vimeo, or YouTube. A thumbnail of the video will be added to the page. When you click the thumbnail, the video will play. You can resize this thumbnail like any other image, as described above.
Loop Components: If you have a Microsoft 365 business, enterprise, or education account, you can embed one or more Loop components on a page. These are interactive content snippets that you and others in your organization can collaborate on. See “How to use Loop components in Microsoft 365 apps” for an in-depth guide.
In some versions of OneNote, the following element is included on the Insert toolbar. In the current OneNote app for Windows, you’ll find it on the Home toolbar.
Meeting Details: This button opens a sidebar along the right of the screen. On it, you can select a date from your Outlook calendar that has a meeting or other event scheduled on it. Its details, such as time, date, place, and attendees, will be inserted onto the page.
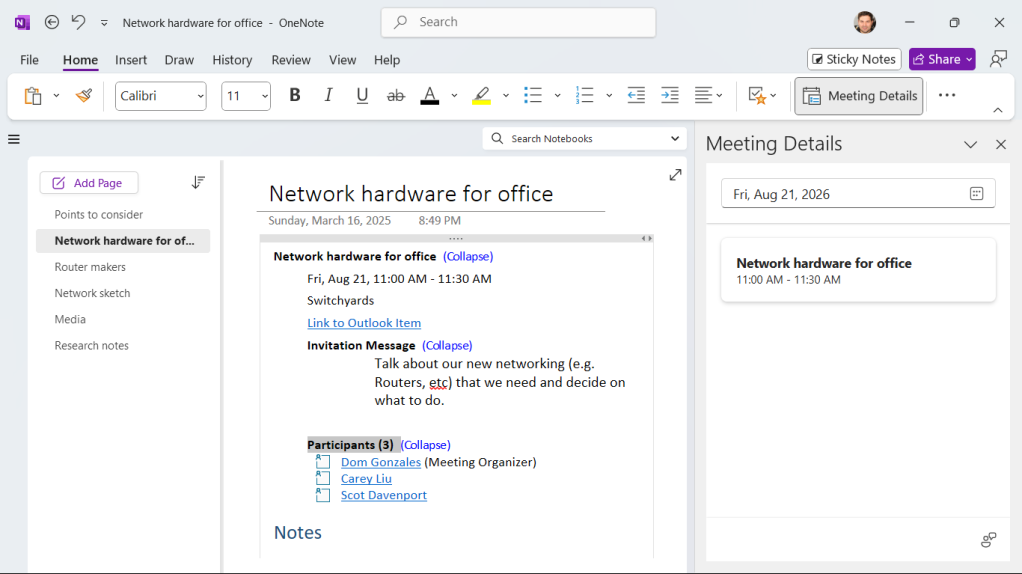
Inserting meeting details from Outlook into a note.
Howard Wen / Foundry
In the OneNote mobile app: To add images or other elements to a page, tap the spot on the page where you want to put the item. The on-screen keyboard of your phone or tablet will open with a toolbar along the top of the keyboard.
In Android, tap + on the left of this toolbar to insert elements such as images, files, audio recordings, tables, and links.
In both Android and iOS, you can tap the camera icon to insert a photo taken with your device’s camera or insert one that’s already stored on it. Tap the microphone icon to record a voice clip using your device’s microphone.
Add drawings and change the page background
You can enhance your note by drawing on it or changing its design.
Add a drawing: Click Draw on the toolbar above the page. This opens a toolbar that lets you draw on the page, choosing from a range of colors and line thicknesses, or insert shapes such as ovals, rectangles, and triangles. You can also use these tools to draw on top of images that you’ve added to a page.

The drawing tool lets you add quick sketches or diagrams to a note.
Howard Wen / Foundry
Change the page background: Click View on the toolbar above the page. To add horizontal or grid lines to the background, click Rule Lines and make a selection. To change the page’s background color, click Page Color. On the panel that opens, select a color.
In the OneNote mobile app: To add a drawing to a page on iOS, tap the pen tip icon at the upper right of the screen. In Android, tap anywhere on the page to call up your on-screen keyboard. Tap the + on the left of the toolbar at the top of the keyboard. On the panel that opens, tap the pen tip icon.
In both OSes, a basic drawing toolbar that includes different markers, an eraser, and a cut-out tool will open above the page. In Android, you can tap and hold a marker until a panel opens that lets you change the color or thickness of the marker.
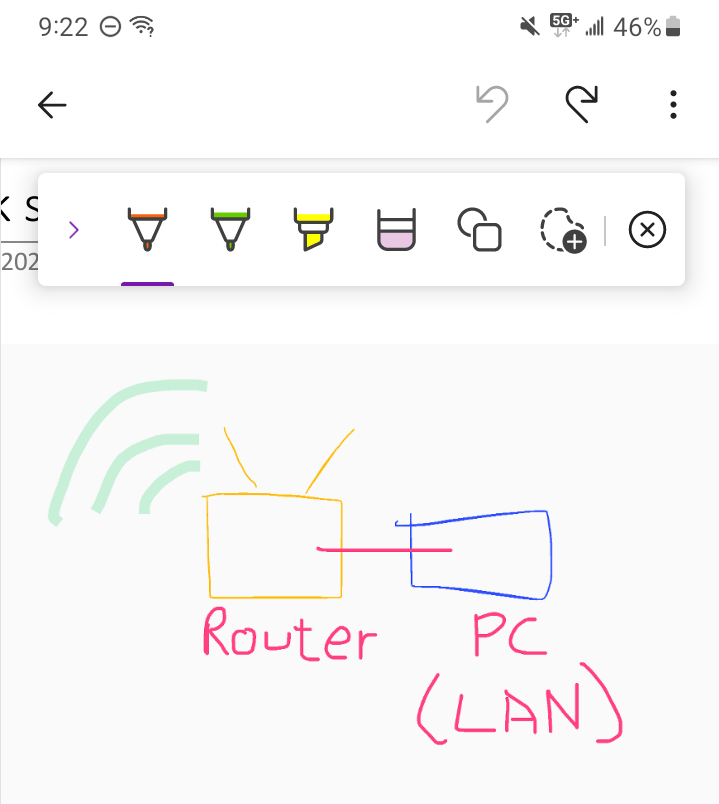
The drawing toolbar in Android.
Howard Wen / Foundry
Organize your notes
To access your notes more efficiently, it’s worthwhile to think about how you want to organize them. You can create multiple sections within a single notebook for different projects, or create separate notebooks for different purposes.
Move a section or page to a different spot in its column: Click-and-hold the name of the section or page, then drag it up or down the list to where you want to move it.
Move or copy a page to another section: Right-click the name of the page and select Move or Copy. On the panel that opens, select the section that you want to move or copy the page to, and then click the Move or Copy button.
Move or copy a section to another notebook: Right-click the name of the section and select Move or Copy. On the panel that opens, select the notebook that you want to move or copy the section to, and then click the Move or Copy button.
Delete or rename a section or page: Right-click the name of a section or page and choose Delete or Rename.
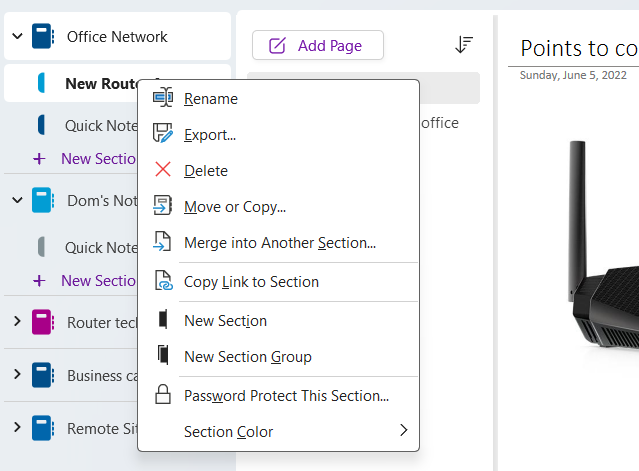
The right-click menu for a section of a notebook.
Howard Wen / Foundry
Move a notebook: In the first column, click-and-hold the name of a notebook and drag it up or down the list. Let it go in the new place where you want it to be on the list.
Rename a notebook: In the first column, right-click the name of the notebook and select Properties. On the panel that opens, type a new name into the box by “Display name.”
Delete a notebook: Oddly enough, you cannot delete a notebook directly from the OneNote desktop app. If you created your notebook in OneDrive, its file will be in the Documents folder in your OneDrive; you can delete it using the mobile app or web version of OneDrive. (But you can’t use File Explorer to access your OneDrive to delete a OneNote notebook file — it doesn’t appear in File Explorer.)
However, if you created the notebook in a folder on your PC’s storage drive, it appears in Explorer in a folder with the name of your notebook. You can delete this folder to delete your notebook.
- To move a section or page elsewhere in the list, tap and hold the name of the section or page, then drag it up or down in the list.
- To copy or move a page to another section or a section to another notebook, tap and hold on the name of the page or section to select it. Then tap the icon of a page with an arrow over it — in Android it’s at the upper right, on iOS it’s at the bottom of the screen. In Android, select the section or notebook to move the page or section to, and also select Create a copy if you want to keep a copy in its current section. In iOS, choose either Move or Copy, then select the location to move the item to.

Moving a page to another section in Android.
Howard Wen / Foundry
- To delete a section or page, tap and hold the name of the section or page to select it, then tap the trash can icon.
- To rename a section, tap and hold on the name of the section to select it. Then tap the cursor icon — in Android it’s at the upper right, in iOS at the bottom of the screen — and type in the new name.
- To rename a page, tap to open the page. Next, tap the first line of text at the top of the page. Delete this text and enter a new name for the page.
Search your notes
Toward the upper right of the OneNote app, click inside the box that has a magnifying glass icon and the words Search Notebooks. This will open the search pane. Type words or phrases into the search box to find pages that contain this text.
Search results appear on this pane. Click a result to open the page in the main window.
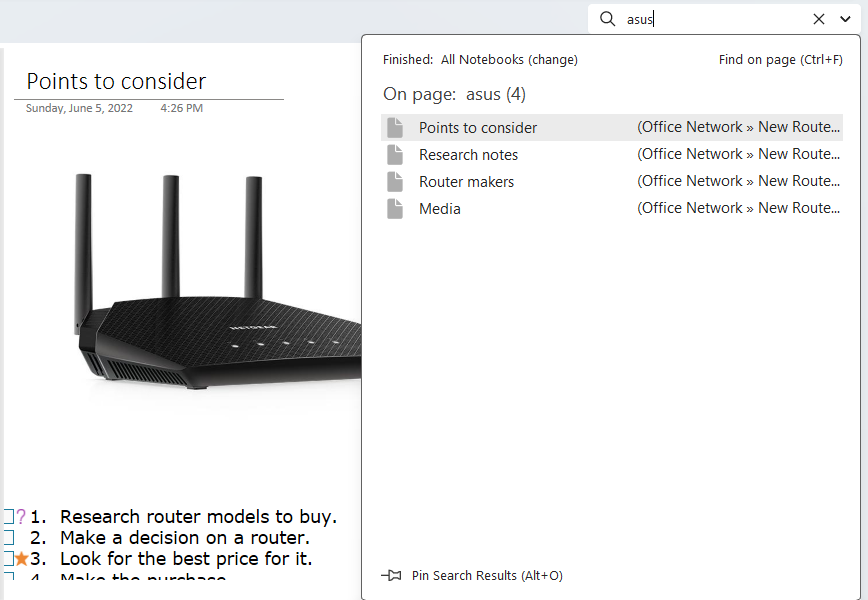
Searching in OneNote.
Howard Wen / Foundry
Click the down arrow at the right of the search box to open a dropdown where you can broaden or narrow the search range: You can search for text through all your notebooks, the current notebook, the current section, or the current page.
Share and collaborate
There are two ways that you can share and collaborate with others on your notes.
Share a web link: Right-click the name of a notebook, section, or page, and select Copy Link to Notebook (or …Section or …Page). This generates a link to the item, copying it to the Windows clipboard. As with any ordinary web link, you can paste it in an email, instant message, document, etc.
Anyone who has a link to one of your notebooks can view all the sections in it and all the pages under each section. If it’s a link to a section, they can view only the pages under that section. A link to a single page allows them to view only that page.
Share your entire notebook: You can invite specific people to view and edit the notebook that’s currently open in the OneNote app. Click the Share button at the upper-right corner of the OneNote app and select Share Entire Notebook.
On the “Send link” panel that opens, there’s an area at the top where you can invite specific people to your notebook, and an area toward the bottom where you can copy a link to your notebook that you can send to others.
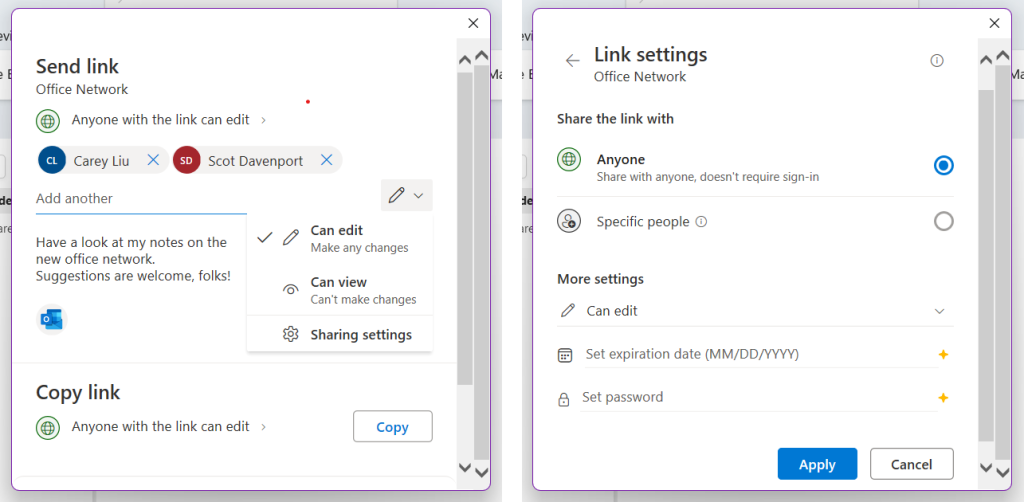
Adjusting sharing permissions for a notebook.
Howard Wen / Foundry
If you’re using OneNote under a work or school Microsoft account, sharing is governed by your organization’s rules. For instance, some organizations may not let you share notebooks to anyone outside your organization.
If you’re using OneNote with a personal Microsoft account, the default permissions allow anyone who clicks the link to edit your notebook, not just people you’ve invited specifically. That means the people you’re sharing the link with — and anyone they share the link with — can change anything about your notebook, including any sections and pages within it. Their changes will be synced to your copy of the notebook on your OneDrive or PC drive.
Instead, we advise one of these safer options:
- To invite specific people to edit or view your notebook: Click Anyone with the link can edit at the top of the “Send link” panel. On the “Link settings” panel that appears, click Specific people and then click Apply. You’ll be taken back to the “Send link” panel. Enter the email addresses or names of those you want to invite and optionally type a message to them. If you want your recipients to be able to view the notebook (including its sections and pages) but not alter it, click the pencil icon and select Can view. Finally, click Send. They’ll receive an email containing a link that can be opened only by them.
- To allow anyone with the link to view the notebook but not edit it: On the “Send link” panel, click Anyone with the link can edit at the bottom (below “Copy link”). The same “Link settings” panel described above will open: Under “More settings,” click Can edit and select Can view. Then click Apply, which will return to the “Send link” panel. You can copy and safely send the link to your notebook for others to view and share.
Manage your notebook’s sharing permissions: After you’ve shared a notebook, you can stop sharing it or change anyone’s access permissions at any time. Click the Share button and select Manage Access.
On the Manage Access panel that opens: Click People to see a list of people that your notebook is being shared with. You can change each person’s access (between Can edit and Can view) or remove their access entirely. Click Groups/family to be able to do the same to groups of people that your notebook is being shared with. Click Links to change the access to your notebook’s public link (Can edit or Can view), or you can take down the link.
In the OneNote mobile app: To share your notebook in Android, tap Notebooks at the upper-left corner of the OneNote app. Tap-and-hold the notebook that you want to share. Then tap the Share icon at the upper right (it’s to the left of the three-dot icon). In iOS, open the notebook, then click the three-dot icon at the upper right and select Share Notebook.
On the screen that appears in either OS version, you can choose either to invite specific people to your notebook or to copy a link to it that you can send to others via email, instant message, text, etc. The interface varies somewhat depending on which OS you’re using and whether you’re using a personal or work/school account, but overall the sharing functions and selections in the mobile app are very similar to those of the OneNote app for Windows.
Restore an older version of a page
If you’re not happy with recent changes to a page, you can go back and restore an older version of it.
Open the page in the main window of OneNote. Along the top of the OneNote app, click the History tab. On the History toolbar, click Page Versions. (In the OneNote web app, you’ll find Page Versions on the toolbar’s View tab.)
To view an older version: In the second column, listed directly below the name of the page, you’ll see one or more dates that represent older versions of it. Click the date of an older version to open it.
To restore an older version: Right-click the date of an older version of the page, then select Restore Version from the pop-up menu. This will replace the page with the older version. What was the current version will then be moved down in the versions list to become the most recent older version.
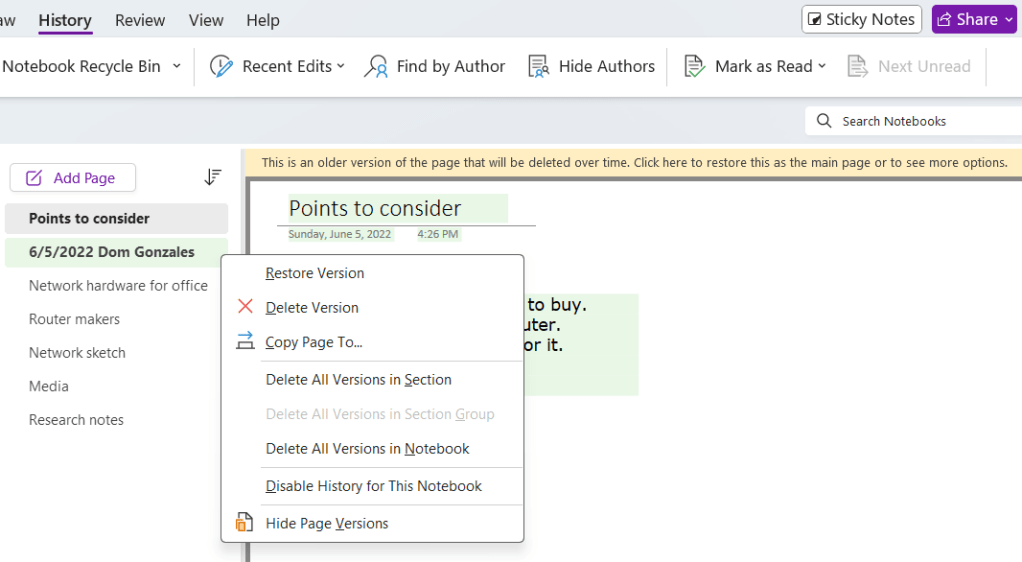
You can choose an earlier version of a page to go back to.
Howard Wen / Foundry
This story was originally published in July 2019 and most recently updated in May 2025.